|
||||||||||||||||||

|
The following review is split into three separate parts. The first is an overview of the kit, the second is dedicated to the building of the kit; whereas the final part is dedicated to the resulting piece of hi-fi equipment and its performance as an audio reference.
| PART 1 - Overview |
| Introduction |
AudioNote Kits have offered their L3 Line pre-amplifier for some time now (although it has undergone a few refinements along the way). It is based on the output circuitry of the highly acclaimed Audio Note M3 finished product pre-amplifier but uses the M2 power supply (as used in many other of their kits now). In the L3 pre-amps however, there is the addition of some choke decoupling that has been recently introduced into the power supply - I believe this is only necessary for the L3 pre-amps however and not other kits that use the same power supply.
| Output Coupling |
Using output transformers also simplifies the overall circuit somewhat - allowing significant upgrades to be made possible by simply upgrading the output transformers themselves (which is a very easy job to perform). Indeed, I will be starting off with their now standard I/E core, single-ended output transformers. Other possible options include balanced I/E core or the various grades of Hi-B double C-core that Audio Note offer (including silver wound variants) - all of which can configured for balanced or single-ended operation. I will probably upgrade to one of their Hi-B designs eventually.
Well-designed output transformer designs also have many sonic advantages over capacitor-coupled designs. I have already mentioned the low output impedance - often the lower the impedance, the better energy transfer can take place. This can greatly improve lower frequency detail. Capacitor coupled designs also have more of a tendency to shape (or filter) the output waveform - making it difficult to design a circuit that doesn't adversely 'shape' the resulting signal. So, why don't we see more transformer-coupled designs? There are two main reasons for this. The first is cost - adequate transformers are much more expensive than most capacitors. The second is design - designing a transformer to be linear over the full audio spectrum can be difficult and requires careful construction as well as quality materials (both upping the price once again). As mentioned earlier, however, using output transformers can also lower the complexity of the driver circuitry. In addition, AudioNote Kits can also provide a single-ended only output transformer, which reduces the cost somewhat (all of the other standard Audio Note pre-amp output transformers are balanced designs often using bi-filer or tri-filer windings - requiring very precise hand winding etc).
| Remote Control Capabilities |
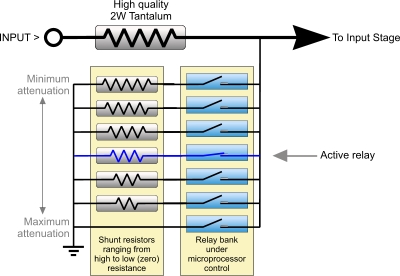
Unlike most remote control pre-amps that rely on motorised volume controls and the like, the L3 Remote uses quite a novel design. For volume controlling, it uses a shunt attenuator topology that is switched under microprocessor control. Shunt attenuators are very simple but also capable of truly excellent results when done properly. This one has one very high quality resistor (a 2 Watt Tantalum) in series with the signal at all times and the attenuation is achieved by grounding (i.e. shunting) the signal through another resistor (a low wattage Tantalum) to ground (or direct to ground for maximum attenuation) the value of these 'shunt' resistors vary to give progressive steps in volume. It is the shunt resistors that are switched under microprocessor control so no switch contacts are in the actual signal path (as far as attenuation is concerned, that is).
Normally, the switched attenuators that you find that use arrays of resistors work by switching resistors of various values into the signal path - this is fine but can become very expensive when using very high quality resistors such as, for example, 2W Tantalums. The shunt attenuator gets around this problem while keeping the signal quality high - in fact Audio Note's most expensive pre-amps use shunt attenuators (albeit manually switched ones).
You can see how it has been implemented in the following diagram:
|
Here is a diagrammatical representation of the shunt attenuator applied to one channel's input.
Here I am only using 7 attenuation steps, whereas the L3 Remote pre-amp uses 24 steps. |
Input switching is also under microprocessor control. Here, one of four high quality stereo relays is switched in per channel - thus allowing 4 inputs.
There is also a left/right channel balance option - but I didn't go for that. That consists of having 2 volume boards - one stacked on top of the other acting independantly of each other.
Another option available is a manual volume control - unlike what you would expect, however, this interacts with the microprocessor rather than being in the signal path. So it rotates without stopping at any point.
The front panel of the L3 Remote is semi-transparent so that the main LED display can show through without a cutout being necessary. I quite like this approach as it better matches my other kits (i.e. DAC 2.1 and L3 Phono Stage) and ensures a nice flat front panel surface. The only problem is that it can let light through at its edges. So, to get around this, I used a black backing on the rear of the front panel before fitting with about a 1mm clearance around the edge.
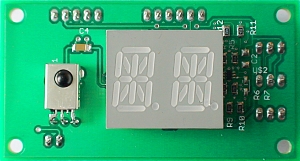
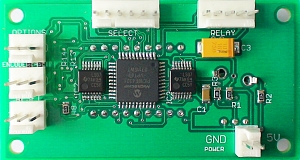
The main controller board, which has a direct connection to the power supply, houses the 2-digit (each digit having 14 segments) LED display and infra red sensor on one side and main controlling processor and controller lead-outs that connect both data and voltage supply to the other two boards and, the 5v supply in, and various other control interface inputs for other uses.
|
|
| The main controller board seen from front (left) and rear (right) | |
The main controller board then dispatches instructions, and provides voltage, to the 'input selection board' and the 'volume relay board'.
The Input Selection Board switches between the stereo inputs using high quality, gold clad silver contacts inside sealed relays. There are 4 relays on the board - thus allowing 4 distinct inputs.
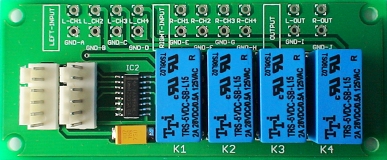
The Input Selection Board
The Volume Relay Board houses the shunt attenuator along with 24 stereo relays (the same type used on the Input Selection Board). This is the only board that you have to populate yourself width 48 resistors. It also houses some logic chips. It looks as though the board can be used and configured in different ways because the top and bottom are scored so as to be detachable from the main part of the board. I know from looking on the AudioNote Kits website that two of these boards can be used to provide balance control and in those pictures, one of the parts of each board have indeed been removed.
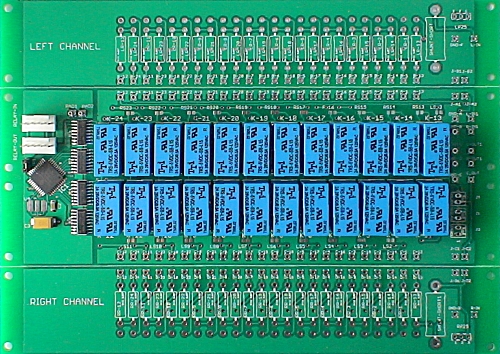
Volume Relay Board - currently unpopulated
| Practicality |
| About the L3 Pre-amplifier Kit Range |
Where the two L3 models differ is input switching and attenuation. The L3 Remote (reviewed here) uses a remote controlled microprocessor to switch inputs and control a stepped shunt attenuator (as described in the previous section). The other (the L3 Line) has a vast range of options for switching inputs and controlling volume - making it very versatile and customisable by the builder. It includes an input selector extender that allows the input switch to reside at the back of the chassis in order to keep input wiring to the switch as short (and as cost effective) as possible before routing its output through a high quality screend cable to the rest of the pre-amp.
As with all their kits, various component qualities are available. For example, resistor and capacitor types etc. I went for Signature grade components (i.e. Tantalum resistors on the inputs and Copper capacitors in the output stage) although it is possible to go to extremes if your budget allows.
Another area that makes a big difference to both performance and budget is the type of output transformers that are chosen. I went for their base level transformer (which is by no means cheap and nasty) - this is a single-ended (non-balanced) I/E core design - all other available ones are balanced output types (at time of writing) which instantly increases the price - I have no intention of using balanced outputs at this stage anyway. Eventually, I plan to upgrade to a higher level transformer with double C-cores. Audio Note produced a varied range that includes different core grades and winding types (copper/copper, copper/silver, silver/silver etc) and ranging in price from around £150 to £2,500 (UK pounds at time of writing).
For more information and pricing, please visit the AudioNoteKits.com website.
| PART 2 - The Build |
| PART 3 - Performance |
| First Impressions |
| Breaking-in |
| Conclusion |
Written by Paul Brookes
Published -- --- ----
| Turntable | Audio Note TT-2 |
| Arm | Audio Note Arm1 |
| Cartridge | Audio Note IQ2 |
| Phono Stage | Audio Note L3 Phono Stage Kit |
| Amplifier | Audio Note PQ Signature Kit1 |
| Interconnects | Audio Note AN-v |
| Speakers | Audio Note Kit03 Speakers |
| Speaker Cable | Unknown silver multi-stranded |
| CD Transport | Audio Note CDT-One |
| DAC | Audio Note DAC Kit 2.1 Signature with USB interface |
| Links |
| Audio Note L3 Remote Pre-Amplifier Build Process |
|
|