|
||||||||||||||||||

|
Lacing is simply the process of arranging and securing wiring looms. This method is usually preferable to simply tie-wrapping because the wires remain loose and malleable; allowing easy moulding and re-moulding of their positions.
Firstly, you will need some lacing chord. I get mine from RS Components part number 554-080 for a 25 metre reel. Their description is: A strong and flexible rayon-cored PVC string for all 'cable-forming' and similar applications. Dia. 0.75 mm. Breaking strain 4.5 kg (10 lb).

The make-up of the lacing chord is important. Having a soft, collapsible internal structure and a harder high-friction outer layer, it will tend to stay where it is with little slippage while you are knotting and maintain a high friction contact with the wires.
Although there are plenty of exotic and complex knots associated with some lacing techniques (from those who like to turn such things into a science), you only really need to know two simple knots.
I personally think that the hardest part of all is estimating the length needed for a loom. If you underestimate, you can always terminate and start a second on the same loom but this is a bit sloppy. I tend to over-estimate on purpose.
| End securing knot |
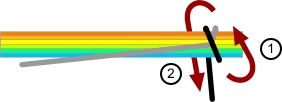
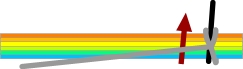
In the following illustrations, our imaginary loom is being laced from right to left. I found that it was not an easy task drawing knots - so I hope the following make sense to you.
Note that lacing shown in black is the part that we are currently working with. The lacing shown in gray is lacing that we have already dealt with.
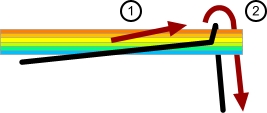 Start from the top and round the back. |
|
 Thread under and through. |
 Pull toward you and tie several ordinary knots to finish. |
You will find that the starting knot is easier to do than the ending knot. This is simply because at the end of your loom, there will be more tension than when you started it so it will be more difficult to thread the ends of your lace.
The end knot can, therefore, be concluded slightly shorter than where you want it go and slid into place, creating the final tension.
It has always been a habit of mine to place a blob of nail varnish on the end knots just to make sure they don't move over time. This is not absolutely necessary, however.
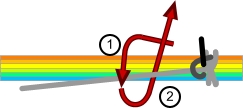
| Interim knots |
- Always maintain tension on the chord - placing your thumb on the previous loop will help.
- Keep the loops on the top of the loom - don't let tham start to slide in a different direction.
- Try to get each loop spaced equally - you choose the distance appropriate for the size of the loom.
 First, take the lace behind and round. |
 Bring it back over and thread under. |
 Pull up towards you and down to the center to continue onto your next loop or end knot. |
|
| A finished loom |

The start knot can be seem on the right of this picture. Even two wires loomed like this remain mouldable and, as long as the correct amount of tension has been used, will stay where they are put without flopping around.
|
|