|
||||||||||||||||||

|
The following review is split into three separate parts. The first is an overview of the kit, the second is dedicated to the building of the kit; whereas the final part is dedicated to the resulting piece of hi-fi equipment and its performance as an audio reference.
| PART 1 - Overview |
| Introduction |
I mentioned my dilemma to Brian Smith at AudioNote Kits. He told me that he had been working on a new phono stage for that very same reason - although the MM-Phono Stage had been 'quite' good, it was not up to the same level as his other top of the range kits and was letting the side down somewhat. I had to find out more.
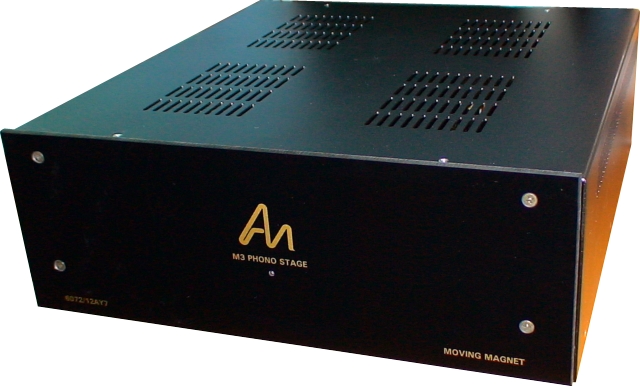
The new phono stage (the L3 Phono Stage Kit) uses the same circuit used in the famous Audio Note M3 finished product - a highly respected pre-amplifier. It uses two 6072 valves on its input; feeding an RIAA passive EQ circuit (which is said to be much more accurate than the board used in my previous phono stage kit). This then feeds into another 6072 output valve. The power supply is the now familiar M2 power supply (as used in the DAC Kit 2.1 and the MM-Phono Stage), which again is taken from Audio Note's finished product line.
So I decided to bite the bullet and order the new phono stage to replace my existing one. I saved some money by re-using the mains transformer and choke from the old phono stage.
| RIAA Equalisation |
The audio signal that is written to a vinyl disk has to be changed before it's grooves are cut into a disk. If it were left unchanged the low frequency bass energy would cause the grooves to be too big and cause either bleed onto the groove next to it or would mean the grooves would have to be spaced out at a much greater distance from each other - resulting in less time on the disk. This problem was recognised very early on in the history of vinyl records. The solution was to apply equalisation when cutting the master disk and applying an exact inverse equalisation when playing back.
In the early days, there was no fixed standard so different manufacturers applied a different curve to their recordings - resulting in unpredictable reproduction. This changed however in 1954 when the Recording Industry Association of America (hence RIAA) managed to establish a truly recognised standard.
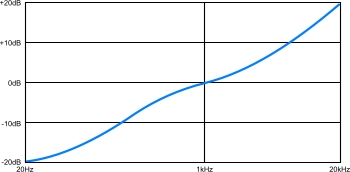 Curve used when cutting |
 Curve used on play-back |
As you can see above, bass is cut dramatically and treble boosted when cutting the disk. The direct opposite curve is then applied at play-back. This has several advantages and disadvantages.
Advantages
|
Disadvantages
|
The M3 phono circuit used here in the L3 phono stage recreates the RIAA curve passively. This means that it uses passive components. Some phono stages attempt to do this using active components (such as op amps etc) but these tend to introduce unwanted noise into the circuit.
| Why Valves |
Transistors are simply not capable of the same wideband behaviour as valves and results in the need for a number of (overlapping) transistors to be used often with various filters being used to emulate different frequency bands etc. This results in the use of a greater number of components being used - which is exactly what you want to avoid in an audio circuit because each component used will alter the sound somewhat.
Valves, therefore give rise to fewer components in the audio circuit that, in turn, allows you to spend your money on higher quality components. Topology of the circuit is also greatly simplified making it easier to understand a valve circuit.
The distortion characteristics of valves is also different to that of transistors. Valves tend to produce 2nd harmonic distortions; whereas, transistors tend to produce 3rd harmonic distortion which is effectively less musical in nature. I discuss more about these characteristics in another article (see link at the bottom of the page entitled 'Simple Valve Theory).
Of course there are drawbacks to using valves. The main one is that high voltages are required.
| About the L3 Phono Kit Range |
The configuration that I decided upon was as follows:
- 1 Watt tantalum resistors
- Copper foil signal capacitors
- Black gates
- AN-V signal cables
For more information and pricing, please visit the AudioNoteKits.com website.
Note that although the L3 Phono Stage kit is specifically geared for Moving Magnet phono pick-ups, an external step-up transformer kit is now available from AudioNote Kits that is configurable for most Moving Coil pick-ups.
| Ordering and Dispatch |
The kit took the usual 6 days to arrive in the UK from his base in Canada. Everything was very well packed for the journey (as I have come to expect) with no problems encountered.
| PART 2 - The Build |
| Overview |

|
I have documented the build separately on this site - a link to it can be found at the bottom of this page.
This is now the sixth kit from Audio Note that I have built. Just as the DAC Kit 2.1 replaced its predecessor the DAC Kit 1.1; this kit replaces its predecessor the Kit1 Phono Stage (which was later renamed the MM Phono Stage). It is good to see that the kits are constantly improving and evolving as they are. The front plates of the kits now come with gold lettering instead of the white lettering that my DAC Kit 2.1 had (it too now comes with the gold lettering faceplates). This is a nice improvement and I am hoping to get a new faceplate soon for my DAC so that he two units match nicely.
|
| The Power Supply |
|
You can split this kit into two main sections; the power supply and the phono board.
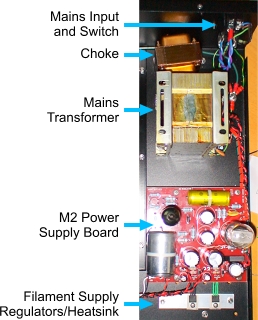
The power supply consists of the same M2 power supply that I have already built for both my DAC Kit 2.1 and my previous phono stage (although there are slight voltage differences and therefore some component values are different). The power supply is easy to build as it consists of a standard PCB, choke, and mains transformer. This power supply is taken directly from the Audio Note M2 pre-amplifier finished product and appears to be quite versatile as it is used in a number of the kits now - although with slight variations when different HT (high tension) voltages or filament voltages are called for. A 6X5 valve is used for the HT's voltage rectification followed by an ECL82 for regulation. I know from my DAC Kit that it is capable of excellent results. The power supply is isolated from the rest of the kit by the use of a large metal screen that runs down the side of it. You fit this yourself and it is electromechanically connected to the main chassis. The mains transformer is a multi-tap design - making it suitable for use anywhere in the world - the manual goes into detail of how to configure it for different countries. |
| The Manual |
|
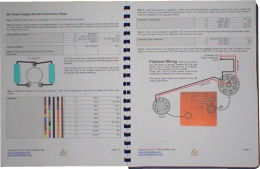
The manual is excellent. It is full of detailed full-colour pictures and explanations. All part lists have accompanying resistor colour code blocks - making correct resistor selection a breeze.
It consists of 62 pages with 13 main sections and an appendix that contains schematics, general colour code reference, and a pull-out colour code reference specifically for the phono board build (which proved to be very useful). It is difficult to go wrong with a manual like this. |
| The Phono Board Build |
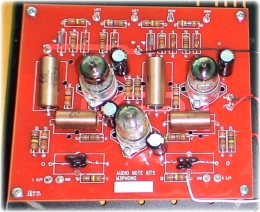
|
The phono board is taken directly from Audio Note's M3 finished product and is a high quality, silver hard-wired board. The kit division have modified the board to make it easier to build by adding some nice wide PCB tracks for the ground, filament shorting, and HT shorting. Because these are the only tracks on the board, it has meant that they could be made quite wide - thus increasing the amount of copper that you would normally find on a typical PCB board track. Of course you don't need to use them at all - you can duplicate them with silver wire (as I have done with the ground trace).
The building of this board is what takes the longest as great care has to be taken to get everything just right. There are, however, many aids to doing so - the component markings (ie. R1, C2, etc.) are duplicated on both sides of the board (making it harder to get confused when continually turning the board over to work on either side). The underside of the board shows how the component legs are to be joined together and the earth track helps too. |
| Conclusion |
You must of course judge for yourself whether you are capable of building this kit - that is one of the reasons I have included the build details on this site (see link at the bottom of the page).
| PART 3 - Performance |
| First Impressions |
This phono stage is also quieter than the older model - of course this can only be detected by turning up the volume to a nonsensical level with no music playing - but nevertheless it is good to know.
| Break-In |
During the break-in period, however, the phono stage never disappointed; it just went from good to better and better. There were a few shifts in frequency emphasis, as you would expect during this time, but less extreme than expected - just gentle settling.
| Listening |
In terms of individual frequency ranges, you have a wonderfully silky top-end, high resolution mid, and low but extremely well controlled bottom-end. The balance across the entire range is superb.
Perhaps it is this consistency across the range that makes it as musically involving as it is. I don't know for certain, but it most certainly is capable of pulling you into the music - whatever type you are listening to.
I thought it would be interesting to make some direct comparisons between the new phono stage and my DAC Kit 2.1 (which I rate very highly) as I have a number of albums that I also have on CD.
First up for this comparison was Joni Mitchell's Blue album. Although the DAC's rendition was perfectly satisfying and engaging, the extra headroom and dynamics from the acoustic instruments that were portrayed by the vinyl version rendered the CD flat and a bit lifeless by comparison. The album version is definitely more musically involving.
Next up a change of pace - Michael Jackson's Thriller album. Both versions are standard releases - not remixes or special pressings etc. Here, the vinyl version is much much more interesting, musical, and dynamic than the CD. So much so, in fact, that it sounds like a different performance - makes me wonder if digital was the worse thing that happened to Jackson. The detail that Quincy Jones put into the background sounds and instruments is almost lost in the digital rendition.
It was more than apparent now that sounds of individual instruments could be heard in much more detail on vinyl. This was also true when it came to conveying feeling through voice.
I continued such comparisons on many other albums (in fact I found it quite addictive). I found the same on all of them. The only exceptions were some albums that were badly implemented on one of the formats (mostly heavily compressed CD transfers that rendered any comparison grossly unfair).
| Conclusion |
It has now also overtaken my digital set-up. There are, of course a number of upgrades and modifications that I could make to the digital side of things to possibly re-address the balance but there are even more upgrades that I could make to my vinyl set-up (upgraded arm and cartridge just for starters) - making it unconquerable in the long term.
One thing is certain and that is that I won't be wanting to upgrade my phono stage for a very long time to come.
Highly recommended.
Written by Paul Brookes
Published 26 March 2008
| Turntable | Audio Note TT-2 |
| Arm | Audio Note Arm1 |
| Cartridge | Audio Note IQ2 |
| Phono Stage | Audio Note L3 Phono Stage Kit |
| Amplifier | Audio Note PQ Signature Kit1 |
| Interconnects | Audio Note AN-v |
| Speakers | Audio Note Kit03 Speakers |
| Speaker Cable | Unknown silver multi-stranded |
| CD Transport | Audio Note CDT-One |
| DAC | Audio Note DAC Kit 2.1 Signature with USB interface |
| Links |
| Audio Note L3 Phono Stage Kit Build Process |
|
|